2022年3月28日 星期一

chenhsichuan homework

 第2章威力彩 投影片指令

import requests
from bs4 import BeautifulSoup
url = 'https://www.taiwanlottery.com.tw/'
r = requests.get(url)
sp = BeautifulSoup(r.text, 'lxml')
# 找到威力彩的區塊
datas = sp.find('div', class_='contents_box02')
# 開獎期數
title = datas.find('span', 'font_black15').text
print('威力彩期數:', title)
# 開獎號碼
nums = datas.find_all('div', class_='ball_tx ball_green')
# 開出順序
print('開出順序:', end=' ')
for i in range(0,6):
    print(nums[i].text, end=' ')
# 大小順序
print('\n大小順序:', end=' ')
for i in range(6,12):
    print(nums[i].text, end=' ')
# 第二區
num = datas.find('div', class_='ball_red').text
print('\n第二區:', num)
 
 
1. pandas的DataFrame介紹
 
2. DataFrame的使用
 
 
3. 資料視覺化必懂的Pandas套件繪製Matplotlib分析圖表實戰
read_csv('中文檔名',engine='python',encoding='utf-8')
否則中文檔名會出錯
 
4. 把資料pandas_dataframe練習用資料.csv讀出來並使用jupyter notebook繪製所有同學成績並解決中文問題TaipeiSansTCBeta-Regular.ttf, 這兩個檔案要與程式放在同一個目錄下
%matplotlib
import pandas as pd
import matplotlib.font_manager as fm
import sys
myfont = fm.FontProperties(fname=r'.\TaipeiSansTCBeta-Regular.ttf')
# 讀入資料集檔案
sys.getdefaultencoding()#‘utf-8’;新增支援中文的編碼
#使用open與encoding='utf-8'可讀取中文檔名
df = pd.read_csv(open('.\pandas_dataframe練習用資料.csv',encoding='utf-8'))
#指定姓名欄當成index欄位, 也就是圖中的X軸
df.set_index('姓名',inplace=True)
print(df)
import matplotlib.pyplot as plt
ax=df.plot(kind='bar', fontsize=5,figsize=(20,4))
plt.legend(prop=myfont)
plt.title('學期成績',fontproperties=myfont)
for label in ax.get_xticklabels():
    label.set_fontproperties(myfont)
plt.show()
 
 
5. Pandas的資料存取
 
 
6. 檔案的讀取寫入
fp=open("test.txt","w",encoding="utf8")
fp.write(r.text)#寫入資料
print("寫入檔案text.txt")
fp.close()
--------
fp=open("test.txt","r",encoding="utf8")
str=fp.read()#讀取資料
print("檔案內容text.txt:")
print(str)
fp.close()
----------
#另外一種讀取資料方法
with open("test.txt", "r", encoding="utf8") as fp:
    str=fp.read() #一次讀取全部內容
    print(str)
------
#另外一種讀取資料方法2
with open("test.txt", "r", encoding="utf8") as fp:
    list1=fp.readlines()#一次讀取所有列
    for line in list1:#針對每列以迴圈讀取
        print(line, end="")


#讀取統聯客運三排座票價 https://www.ubus.com.tw/Booking/FareInquiry
 
import pandas as pd
bus_table = pd.read_html("https://www.ubus.com.tw/Booking/FareInquiry")
bus_df = bus_table[0]  #讀取第一個表格國道路線
print(bus_df)
-------------
#如果要將pandas的dataframe(類似excel表格)資料存成csv, 可以使用dataframe.to_csv(), 最好使用with可以自動關閉檔案, 加上encoding='utf-8-sig'可以解決中文亂碼問題。
with open("thefile.csv", "w",encoding='utf-8-sig') as f:
    bus_df.to_csv(f)
 

2014年4月23日 星期三

製作數位教材時, 常需要知道錄製的影片片段長度及該段影片片段名稱, 因為學校使用的是powercam6, 終於自己找到方法, 方法如下


2014年2月22日 星期六

設定virtual pc日期能固定在某一天,不隨主電腦變動

The following article is cited from
(以下的文章是引用)
http://www.nirsoft.net/blog/2008/12/running-operating-system-inside-virtual.html

http://alexchuo.blogspot.tw/2009/08/windows-virtual-pc.html

常常由一個需求是將虛擬電腦設定與主電腦不同日期,因為試用版常常會過了某一天之後不能使用, 如果沒有特別設定, 虛擬電腦會以主電腦的日期為虛擬電腦的日期, 這樣試用版軟體就不能使用了。
以下的設定我在新版win7安裝的virtual pc可以使用(不是virtual pc2007)
Running operating system inside a Virtual PC with specific date/time
When you run operating system inside a Virtual PC, the current date/time is automatically taken from the host operating system.
This feature is useful for most cases, but sometimes you may want to run the guest operating system with specific date and time, instead of the current date/time.
You can do that simply by changing the date/time of your computer, but this change will also affect the other programs running in the same machine.

To change only the date/time of the guest operating system, you can use one of the following methods:
  1. Manually change the .vmc file:

    The .vmc files contain the configuration of each virtual machine and are usually located under [User Profile]\My Documents\My Virtual Machines\[Virtual Machine Name]

    You have to make 2 changes in the right .vmc file:

    A. Disable the time synchronization:


    在.vmc中<base_board>前面加上    <time_sync_at_boot type="boolean">false</time_sync_at_boot>

    <hardware>
      <bios>
        <time_sync_at_boot type="boolean">false</time_sync_at_boot>
        <base_board>
          ...
        </base_board>
        ...
      </bios>
    </hardware>


    Under the following mouse configuration:
    <mouse>
    <allow type="boolean">true</allow>
    </mouse>

    Add this:
    <components>
    <host_time_sync>
    <enabled type="boolean">false</enabled>
    </host_time_sync>
    </components>


    B. Set the desired date/time:

    You have to find the time_bytes value inside the .vmc file, which looks like this one:

    <time_bytes type="bytes">27003200110001201008</time_bytes>

    After finding it, set the desired date/time value according to the following specification:
    Digits 1 - 2 contain the seconds value.
    Digits 5 - 6 contain the minutes value.
    Digits 9 - 10 contain the hours value.
    Digits 15 - 16 contain the day value.
    Digits 17 - 18 contain the month value.
    Digits 19 - 20 contain the year value.

    In the above example, the date/time value is 11:32:27, 20/10/2008

    After making the above 2 changes, save the .vmc file, and the guest operating system will start in the same date/time that you set in the time_bytes value.

    C. 關閉虛擬機器的「網際網路時間」同步化功能:
    1. 在工作列的小時鐘上,按下滑鼠右鍵,選擇「調整日期/時間(A)」指令。
    2. 按下「網際網路時間」索引標籤。
    3. 取消 □ 自動與網際網路時間伺服器同步化(S) 核取方塊,按下「確定」按鈕。
  1. By using RunAsDate utility:

    In order to use this method, download and run the RunAsDate utility, choose the desired date/time, and select the path of the Virtual PC application, (It should be something like C:\Program Files\Microsoft Virtual PC\Virtual PC.exe) and then click the 'Run' button to start running the Virtual PC application. If Virtual PC is already running in your computer, you should close it before starting the new one.


    When you run the Virtual PC application within RunAsDate utility, all the guest operating systems that you run from it will automatically use the date/time that you set with RunAsDate utility, instead of the real date/time of your computer.
If you successfully used one of the above methods, you should have a running guest operating system with the date/time that you chose, while the computer's date/time continues to run normally:


2014年2月15日 星期六

transmission-daemon

sudo service transmission-daemon reload
sudo service transmission-daemon restart
sudo service transmission-daemon status

sudo service transmission-daemon stop


2014年2月14日 星期五

visio

一般若要畫工廠布置圖,可從 新增/地圖與樓面規劃/住宅規劃較合適,因為內建 牆、骨架與結構面板,還有維度-工程面板可用,若開啟時不是選 住宅規劃,若要標註尺寸, 也可用 其他圖形/Visio其他功能/維度-工程(其他圖形/Visio Extras/維度-工程),其他常用的面板包括:  其他圖形/一般/基本圖案,  其他圖形/地圖與樓面規劃/建置規劃/牆、門與窗戶,  其他圖形/地圖與樓面規劃/建置規劃/傢俱,   其他圖形/地圖與樓面規劃/建置規劃/器具,   其他圖形/地圖與樓面規劃/建置規劃/建築核心,    其他圖形/地圖與樓面規劃/建置規劃/辦公室傢俱,      其他圖形/地圖與樓面規劃/建置規劃/辦公室設備。


在畫圖之前,記得先設定 比例尺,設計/版面設定/繪圖比例 自訂縮放,
建議設成 1cm = 1 m,則預設的A4紙張可表示 29.7m * 21m 的範圍,
如果改成 5mm = 1m,則A4紙張可表示 59.4m* 42m,
如果改成 1mm = 1m,則A4紙張可表示 297m*210m,使用者可依自己需求調整。

因為原本預設的標註尺寸顯示的是mm,如果要改變顯示的尺寸單位,可從  設計/版面設定/頁面屬性 頁籤,從度量單位修改,工廠布置圖建議可以改成公尺單位。

其他Visio中標示尺寸的示範例子在其他圖形/Visio Extras/維度-工程 內
http://lowling2011.blogspot.tw/2012/02/visio.html


如果是基本圖案的尺寸, 畫好圓形或矩形後, 在畫面左下角寬度或高度點選後即可設定數字


2014年1月22日 星期三

設定virtual pc並安裝iis

要設定一台virtual pc 上安裝IIS讓host電腦能部屬網站到此虛擬電腦並使用瀏覽器訪視

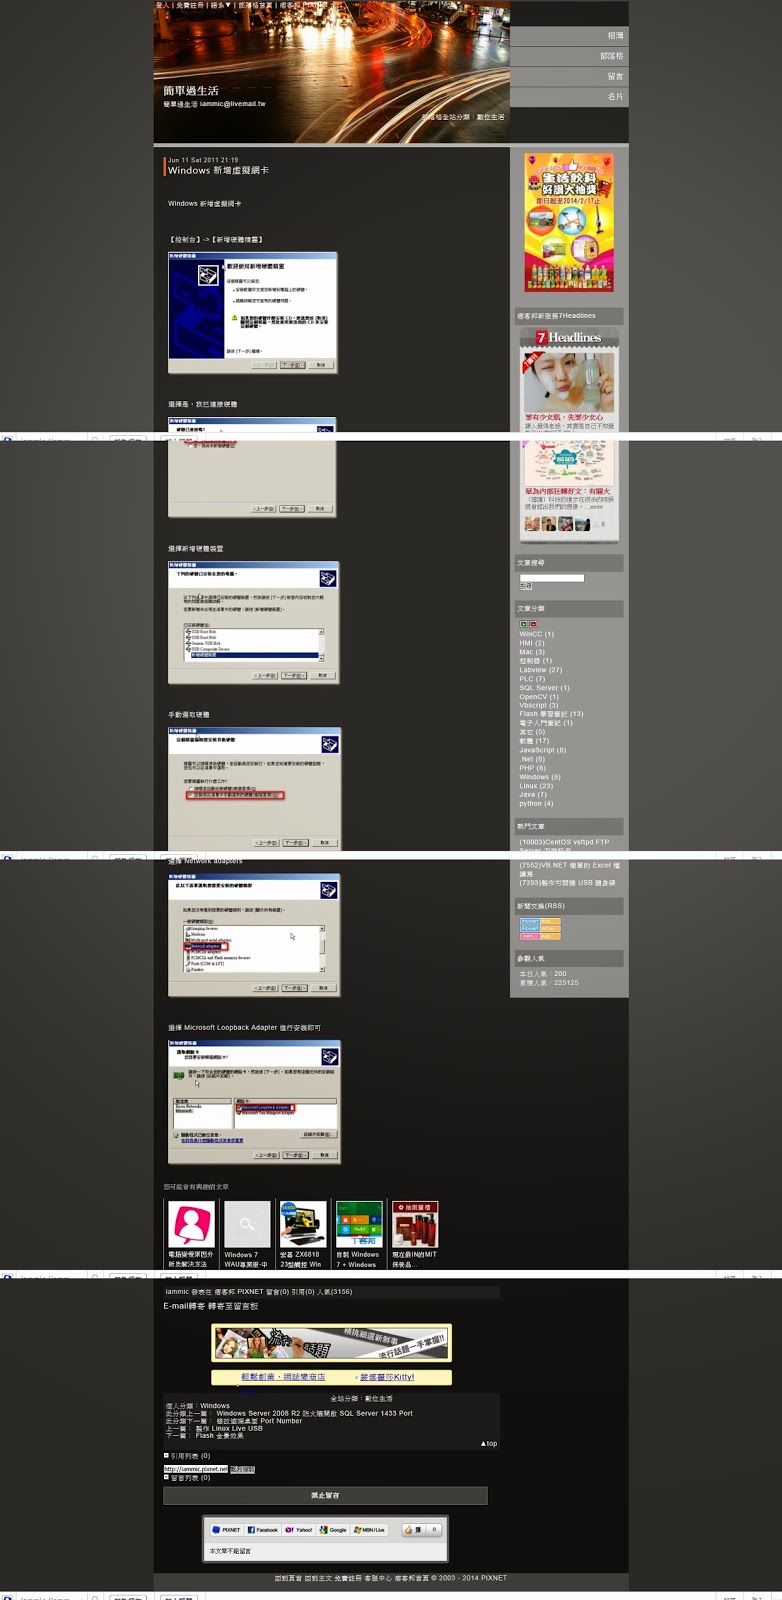
首先先在host上安裝虛擬網路卡, 選擇 Microsoft Loopback Adapter 進行安裝即可, 並將虛擬的網路卡的ip設定成192.168.1.10, 255.255.255.0, gateway留空白, dns設定為192.168.1.1
http://iammic.pixnet.net/blog/post/31969950-windows-%E6%96%B0%E5%A2%9E%E8%99%9B%E6%93%AC%E7%B6%B2%E5%8D%A1
接著設定virtual pc, 設定兩張網路卡(你可以一張設為NAT,一張設為Microsoft Loopback Adapter), 其中一張用nat並在網路設定自動取得IP, 讓virtual pc能上網, 接著在第二章虛擬網路卡設定192.168.1.10, 並將gateway與DNS設定成host的虛擬IP
http://studyhost.blogspot.tw/2008/11/lanhostvpc.html

2013年12月21日 星期六

raspberry pi 調整大小聲

資料參考來自:
http://raspberrypi.stackexchange.com/questions/157/if-i-plug-my-headphones-into-the-audio-jack-how-do-i-control-the-volume

Make sure you are in the user folder:
$ cd ~/

Create the file .bash_aliases (this will be where I keep all the aliases I make so they aren't lost when I reboot my Raspberry Pi):
$ sudo nano .bash_aliases

In the text editor, add the aliases:
# Increase volume by 5%
alias volup='sudo amixer set PCM -- $[$(amixer get PCM|grep -o [0-9]*%|sed 's/%//')+5]%'
# Decrease volume by 5%
alias voldown='sudo amixer set PCM -- $[$(amixer get PCM|grep -o [0-9]*%|sed 's/%//')-5]%'

Exit and save: Ctrl+X, Y, Enter
Reboot:
$ sudo reboot

Log in and test the commands:
$ volup
Simple mixer control 'PCM',0
  Capabilities: pvolume pvolume-joined pswitch pswitch-joined penum
  Playback channels: Mono
  Limits: Playback -10239 - 400
  Mono: Playback 400 [100%] [4.00dB] [on]
$ voldown
Simple mixer control 'PCM',0
  Capabilities: pvolume pvolume-joined pswitch pswitch-joined penum
  Playback channels: Mono
  Limits: Playback -10239 - 400
  Mono: Playback -131 [95%] [-1.31dB] [on]

Note: This solution has only been tested on Raspbian systems only (the OS that the OP assumed they would use).