2022年3月28日 星期一

chenhsichuan homework

 第2章威力彩 投影片指令

import requests
from bs4 import BeautifulSoup
url = 'https://www.taiwanlottery.com.tw/'
r = requests.get(url)
sp = BeautifulSoup(r.text, 'lxml')
# 找到威力彩的區塊
datas = sp.find('div', class_='contents_box02')
# 開獎期數
title = datas.find('span', 'font_black15').text
print('威力彩期數:', title)
# 開獎號碼
nums = datas.find_all('div', class_='ball_tx ball_green')
# 開出順序
print('開出順序:', end=' ')
for i in range(0,6):
    print(nums[i].text, end=' ')
# 大小順序
print('\n大小順序:', end=' ')
for i in range(6,12):
    print(nums[i].text, end=' ')
# 第二區
num = datas.find('div', class_='ball_red').text
print('\n第二區:', num)
 
 
1. pandas的DataFrame介紹
 
2. DataFrame的使用
 
 
3. 資料視覺化必懂的Pandas套件繪製Matplotlib分析圖表實戰
read_csv('中文檔名',engine='python',encoding='utf-8')
否則中文檔名會出錯
 
4. 把資料pandas_dataframe練習用資料.csv讀出來並使用jupyter notebook繪製所有同學成績並解決中文問題TaipeiSansTCBeta-Regular.ttf, 這兩個檔案要與程式放在同一個目錄下
%matplotlib
import pandas as pd
import matplotlib.font_manager as fm
import sys
myfont = fm.FontProperties(fname=r'.\TaipeiSansTCBeta-Regular.ttf')
# 讀入資料集檔案
sys.getdefaultencoding()#‘utf-8’;新增支援中文的編碼
#使用open與encoding='utf-8'可讀取中文檔名
df = pd.read_csv(open('.\pandas_dataframe練習用資料.csv',encoding='utf-8'))
#指定姓名欄當成index欄位, 也就是圖中的X軸
df.set_index('姓名',inplace=True)
print(df)
import matplotlib.pyplot as plt
ax=df.plot(kind='bar', fontsize=5,figsize=(20,4))
plt.legend(prop=myfont)
plt.title('學期成績',fontproperties=myfont)
for label in ax.get_xticklabels():
    label.set_fontproperties(myfont)
plt.show()
 
 
5. Pandas的資料存取
 
 
6. 檔案的讀取寫入
fp=open("test.txt","w",encoding="utf8")
fp.write(r.text)#寫入資料
print("寫入檔案text.txt")
fp.close()
--------
fp=open("test.txt","r",encoding="utf8")
str=fp.read()#讀取資料
print("檔案內容text.txt:")
print(str)
fp.close()
----------
#另外一種讀取資料方法
with open("test.txt", "r", encoding="utf8") as fp:
    str=fp.read() #一次讀取全部內容
    print(str)
------
#另外一種讀取資料方法2
with open("test.txt", "r", encoding="utf8") as fp:
    list1=fp.readlines()#一次讀取所有列
    for line in list1:#針對每列以迴圈讀取
        print(line, end="")


#讀取統聯客運三排座票價 https://www.ubus.com.tw/Booking/FareInquiry
 
import pandas as pd
bus_table = pd.read_html("https://www.ubus.com.tw/Booking/FareInquiry")
bus_df = bus_table[0]  #讀取第一個表格國道路線
print(bus_df)
-------------
#如果要將pandas的dataframe(類似excel表格)資料存成csv, 可以使用dataframe.to_csv(), 最好使用with可以自動關閉檔案, 加上encoding='utf-8-sig'可以解決中文亂碼問題。
with open("thefile.csv", "w",encoding='utf-8-sig') as f:
    bus_df.to_csv(f)
 

2014年4月23日 星期三

製作數位教材時, 常需要知道錄製的影片片段長度及該段影片片段名稱, 因為學校使用的是powercam6, 終於自己找到方法, 方法如下


2014年2月22日 星期六

設定virtual pc日期能固定在某一天,不隨主電腦變動

The following article is cited from
(以下的文章是引用)
http://www.nirsoft.net/blog/2008/12/running-operating-system-inside-virtual.html

http://alexchuo.blogspot.tw/2009/08/windows-virtual-pc.html

常常由一個需求是將虛擬電腦設定與主電腦不同日期,因為試用版常常會過了某一天之後不能使用, 如果沒有特別設定, 虛擬電腦會以主電腦的日期為虛擬電腦的日期, 這樣試用版軟體就不能使用了。
以下的設定我在新版win7安裝的virtual pc可以使用(不是virtual pc2007)
Running operating system inside a Virtual PC with specific date/time
When you run operating system inside a Virtual PC, the current date/time is automatically taken from the host operating system.
This feature is useful for most cases, but sometimes you may want to run the guest operating system with specific date and time, instead of the current date/time.
You can do that simply by changing the date/time of your computer, but this change will also affect the other programs running in the same machine.

To change only the date/time of the guest operating system, you can use one of the following methods:
  1. Manually change the .vmc file:

    The .vmc files contain the configuration of each virtual machine and are usually located under [User Profile]\My Documents\My Virtual Machines\[Virtual Machine Name]

    You have to make 2 changes in the right .vmc file:

    A. Disable the time synchronization:


    在.vmc中<base_board>前面加上    <time_sync_at_boot type="boolean">false</time_sync_at_boot>

    <hardware>
      <bios>
        <time_sync_at_boot type="boolean">false</time_sync_at_boot>
        <base_board>
          ...
        </base_board>
        ...
      </bios>
    </hardware>


    Under the following mouse configuration:
    <mouse>
    <allow type="boolean">true</allow>
    </mouse>

    Add this:
    <components>
    <host_time_sync>
    <enabled type="boolean">false</enabled>
    </host_time_sync>
    </components>


    B. Set the desired date/time:

    You have to find the time_bytes value inside the .vmc file, which looks like this one:

    <time_bytes type="bytes">27003200110001201008</time_bytes>

    After finding it, set the desired date/time value according to the following specification:
    Digits 1 - 2 contain the seconds value.
    Digits 5 - 6 contain the minutes value.
    Digits 9 - 10 contain the hours value.
    Digits 15 - 16 contain the day value.
    Digits 17 - 18 contain the month value.
    Digits 19 - 20 contain the year value.

    In the above example, the date/time value is 11:32:27, 20/10/2008

    After making the above 2 changes, save the .vmc file, and the guest operating system will start in the same date/time that you set in the time_bytes value.

    C. 關閉虛擬機器的「網際網路時間」同步化功能:
    1. 在工作列的小時鐘上,按下滑鼠右鍵,選擇「調整日期/時間(A)」指令。
    2. 按下「網際網路時間」索引標籤。
    3. 取消 □ 自動與網際網路時間伺服器同步化(S) 核取方塊,按下「確定」按鈕。
  1. By using RunAsDate utility:

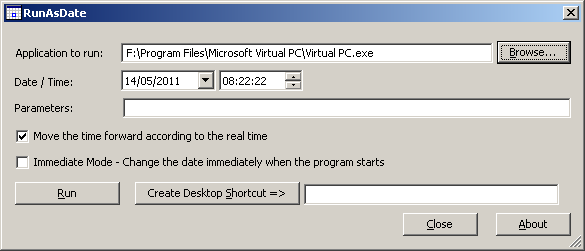
    In order to use this method, download and run the RunAsDate utility, choose the desired date/time, and select the path of the Virtual PC application, (It should be something like C:\Program Files\Microsoft Virtual PC\Virtual PC.exe) and then click the 'Run' button to start running the Virtual PC application. If Virtual PC is already running in your computer, you should close it before starting the new one.


    When you run the Virtual PC application within RunAsDate utility, all the guest operating systems that you run from it will automatically use the date/time that you set with RunAsDate utility, instead of the real date/time of your computer.
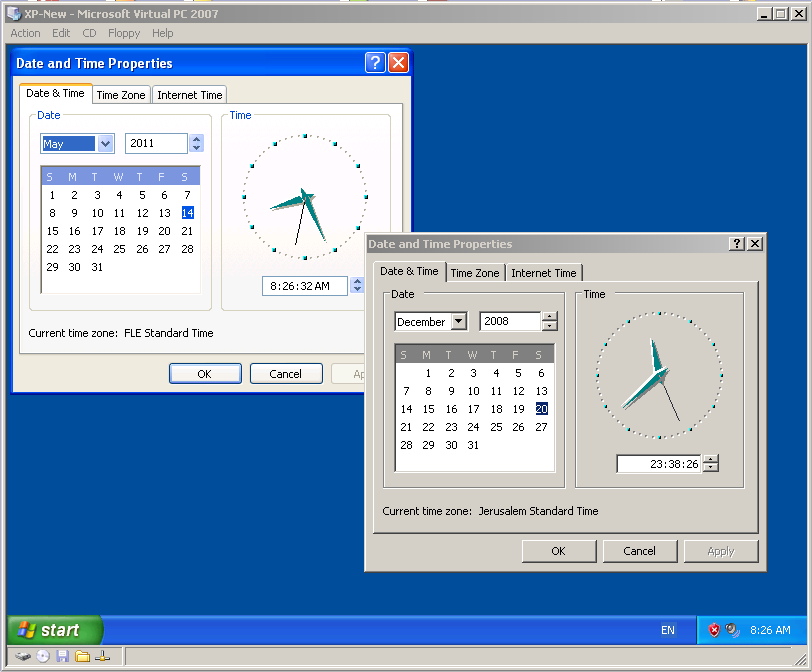
If you successfully used one of the above methods, you should have a running guest operating system with the date/time that you chose, while the computer's date/time continues to run normally:


2014年2月15日 星期六

transmission-daemon

sudo service transmission-daemon reload
sudo service transmission-daemon restart
sudo service transmission-daemon status

sudo service transmission-daemon stop


2014年2月14日 星期五

visio

一般若要畫工廠布置圖,可從 新增/地圖與樓面規劃/住宅規劃較合適,因為內建 牆、骨架與結構面板,還有維度-工程面板可用,若開啟時不是選 住宅規劃,若要標註尺寸, 也可用 其他圖形/Visio其他功能/維度-工程(其他圖形/Visio Extras/維度-工程),其他常用的面板包括:  其他圖形/一般/基本圖案,  其他圖形/地圖與樓面規劃/建置規劃/牆、門與窗戶,  其他圖形/地圖與樓面規劃/建置規劃/傢俱,   其他圖形/地圖與樓面規劃/建置規劃/器具,   其他圖形/地圖與樓面規劃/建置規劃/建築核心,    其他圖形/地圖與樓面規劃/建置規劃/辦公室傢俱,      其他圖形/地圖與樓面規劃/建置規劃/辦公室設備。


在畫圖之前,記得先設定 比例尺,設計/版面設定/繪圖比例 自訂縮放,
建議設成 1cm = 1 m,則預設的A4紙張可表示 29.7m * 21m 的範圍,
如果改成 5mm = 1m,則A4紙張可表示 59.4m* 42m,
如果改成 1mm = 1m,則A4紙張可表示 297m*210m,使用者可依自己需求調整。

因為原本預設的標註尺寸顯示的是mm,如果要改變顯示的尺寸單位,可從  設計/版面設定/頁面屬性 頁籤,從度量單位修改,工廠布置圖建議可以改成公尺單位。

其他Visio中標示尺寸的示範例子在其他圖形/Visio Extras/維度-工程 內
http://lowling2011.blogspot.tw/2012/02/visio.html


如果是基本圖案的尺寸, 畫好圓形或矩形後, 在畫面左下角寬度或高度點選後即可設定數字


2014年1月22日 星期三

設定virtual pc並安裝iis

要設定一台virtual pc 上安裝IIS讓host電腦能部屬網站到此虛擬電腦並使用瀏覽器訪視

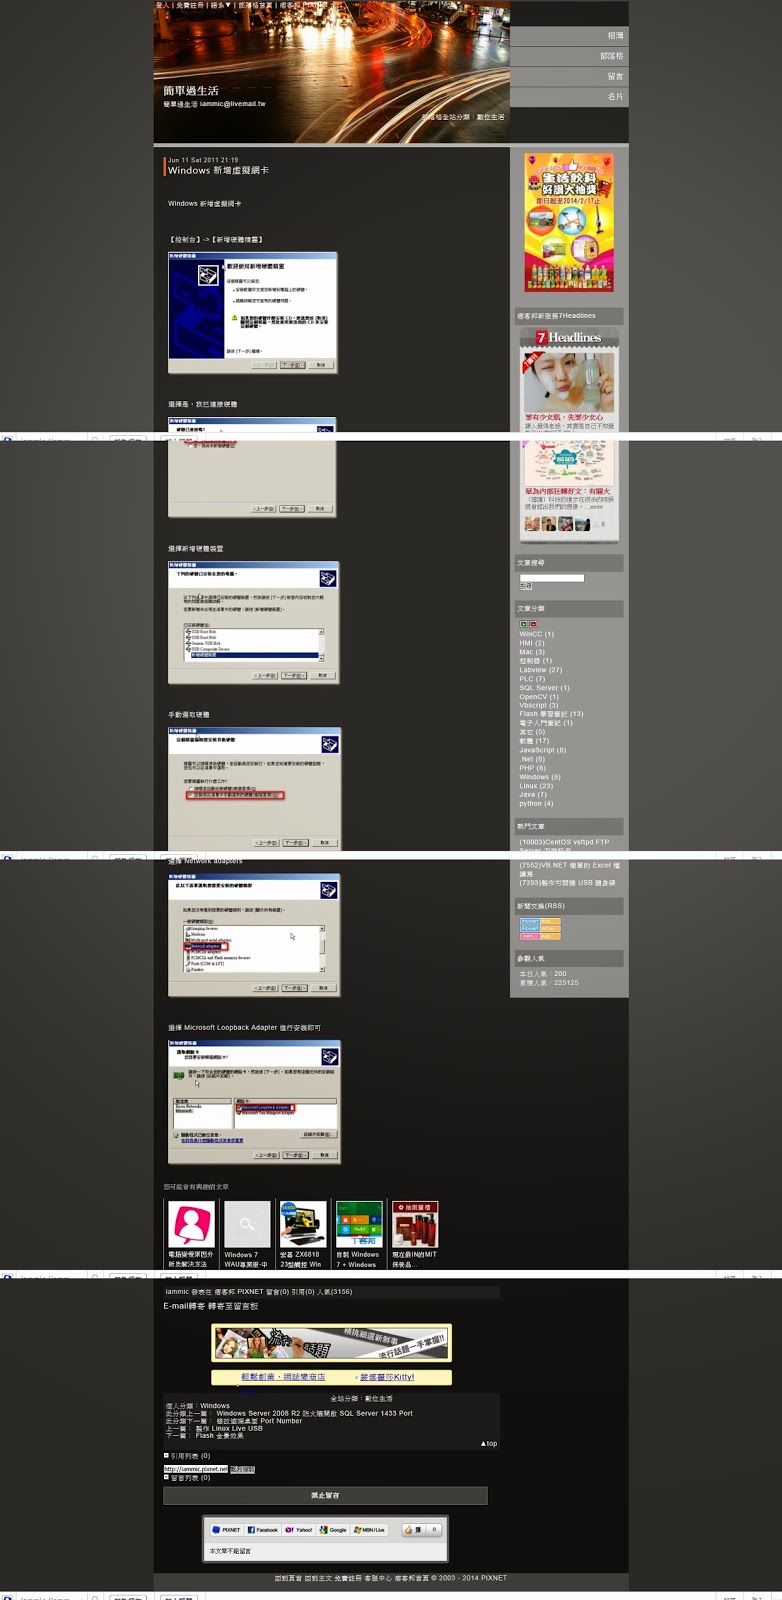
首先先在host上安裝虛擬網路卡, 選擇 Microsoft Loopback Adapter 進行安裝即可, 並將虛擬的網路卡的ip設定成192.168.1.10, 255.255.255.0, gateway留空白, dns設定為192.168.1.1
http://iammic.pixnet.net/blog/post/31969950-windows-%E6%96%B0%E5%A2%9E%E8%99%9B%E6%93%AC%E7%B6%B2%E5%8D%A1
接著設定virtual pc, 設定兩張網路卡(你可以一張設為NAT,一張設為Microsoft Loopback Adapter), 其中一張用nat並在網路設定自動取得IP, 讓virtual pc能上網, 接著在第二章虛擬網路卡設定192.168.1.10, 並將gateway與DNS設定成host的虛擬IP
http://studyhost.blogspot.tw/2008/11/lanhostvpc.html

2013年12月21日 星期六

raspberry pi 調整大小聲

資料參考來自:
http://raspberrypi.stackexchange.com/questions/157/if-i-plug-my-headphones-into-the-audio-jack-how-do-i-control-the-volume

Make sure you are in the user folder:
$ cd ~/

Create the file .bash_aliases (this will be where I keep all the aliases I make so they aren't lost when I reboot my Raspberry Pi):
$ sudo nano .bash_aliases

In the text editor, add the aliases:
# Increase volume by 5%
alias volup='sudo amixer set PCM -- $[$(amixer get PCM|grep -o [0-9]*%|sed 's/%//')+5]%'
# Decrease volume by 5%
alias voldown='sudo amixer set PCM -- $[$(amixer get PCM|grep -o [0-9]*%|sed 's/%//')-5]%'

Exit and save: Ctrl+X, Y, Enter
Reboot:
$ sudo reboot

Log in and test the commands:
$ volup
Simple mixer control 'PCM',0
  Capabilities: pvolume pvolume-joined pswitch pswitch-joined penum
  Playback channels: Mono
  Limits: Playback -10239 - 400
  Mono: Playback 400 [100%] [4.00dB] [on]
$ voldown
Simple mixer control 'PCM',0
  Capabilities: pvolume pvolume-joined pswitch pswitch-joined penum
  Playback channels: Mono
  Limits: Playback -10239 - 400
  Mono: Playback -131 [95%] [-1.31dB] [on]

Note: This solution has only been tested on Raspbian systems only (the OS that the OP assumed they would use).

2013年5月21日 星期二

筆電接單槍投影機的設定顯示方法

參考自 http://www.ptt.cc/bbs/EZsoft/M.1357913495.A.083.html
先說結論:一般使用者方法一就足夠使用,
          若需要同時鎖住鍵鼠訊號可參考方法二
方法一:Windows內建Win+p切換螢幕輸出法
摘要:先透過控制台設定(後述)
      可利用Windows系統內建延伸螢幕的快速鍵:Win + p
      切換至「僅有投影機」的功能,達成關閉筆電螢幕,
      同時不會因為任意鍵鼠訊號而導致螢幕再度開啟。
      想要回復畫面只需要Win + p + p 切換回「僅有電腦」即可。
      (Win+p+p:長按住Win鍵,並按p兩次,Win+p僅會顯示目前螢幕狀態,
       第二次p才會切換至下一項。如果發生螢幕還是黑的別慌張,Win+p+p多切換幾次
       畫面一定可以出現。還有螢幕切換時,視型號會需要一點時間來反映,
       別急著按鍵連發。)
控制台
 設定:進入控制台 -> 螢幕解析度 -> 偵測
      -> 點選新出現的第二顆虛擬螢幕(未偵測到另一部顯示器)
      -> 下方的 多部顯示器(M)下拉選單:仍然在VGA上嘗試連線
      -> 確定

優點:不須安裝任何軟體,Windows系統內建。
      不會因為隨意的鍵鼠訊號而使螢幕再度開啟。
      可透過系統內建DisplaySwitch指令加參數來達成自訂熱鍵(見延伸進階)
缺點:作業系統僅限 Win7(支援) / Vista(未驗證) / XP(未驗證)。
      熱鍵若要自訂可能須利用regedit修改註冊表達成,方法未知。(已解決,見延伸進階)
      此法鍵鼠訊號並未鎖住,也就是說鍵鼠訊號的輸入依然正常,僅止於不會打開螢幕。
      若使用環境上真的有接外接投影裝置,則該裝置啟動。
資料參考:http://www.mobile01.com/topicdetail.php?f=512&t=2502600&p=1#3
          mustrong  2011-12-20 01:59  #10
延伸進階:本法是透過作業系統"C:\Windows\System32\DisplaySwitch.exe"
          的預設快速鍵來達成,可透過各種方式來達成自訂想要的熱鍵
          (建立cmd/捷徑/批次檔、API、Autohotkey類程式)
          displayswitch.exe
            /internal      預設螢幕(等於打開筆電螢幕)
            /clone         同步顯示
            /extend        延伸螢幕
            /external      外接螢幕/投影機(等於關閉筆電螢幕)
ex.以捷徑為例
對著C:\Windows\System32\DisplaySwitch.exe
點右鍵→傳送到→桌面(建立捷徑)
回到桌面對著捷徑→右鍵→內容→目標(T)
                                  在Displayswitch.exe後加上你要的其中一個參數
                                  即可設定此捷徑執行該模式
                                  /internal 預設螢幕(等於打開筆電螢幕)
                                  /external 外接螢幕/投影機(等於關閉筆電螢幕)
        對著捷徑→右鍵→內容→快速鍵 (此處設定你想要的快速鍵)


參考自 http://windows.microsoft.com/zh-tw/windows7/connect-to-a-projector
的方法
按一下 [開始] 按鈕 [開始] 按鈕的圖片,然後按一下 [控制台],以開啟 [控制台]。
3.
在搜尋方塊中,輸入投影機,然後按一下 [連接到投影機]
(若要使用鍵盤快速鍵而非 [控制台],請按 Windows 標誌鍵 Windows 標誌鍵的圖片+P)。
4.
選取桌面的顯示方式:

[僅有電腦] (只在您的電腦螢幕上顯示桌面)。

[同步顯示] (在您的電腦螢幕與投影機上顯示桌面)。

[延伸] (將您的桌面從電腦螢幕延伸到投影機)。

[僅有投影機] (只在投影機上顯示桌面)。


桌面顯示方式選項的圖片桌面顯示方式的四個選項

2013年3月14日 星期四

手機中google行事曆只能看到一個月內的事件

不知道有沒有人發現,使用android手機同步google日曆,會無法看見舊資料(約30天,或上個月之前的),例如你八月買手機,大概六月以前的資料會無法同步到手機。我遇到了這個問題,總算在國外論壇找到解決方式,趕緊分享於此。

1. 把google行事曆匯出
2. 再把剛剛匯出的檔案匯入google行事曆
3. 拿起手機同步

就可以看到以前(超過一個月前)的舊事項了
http://www.mobile01.com/topicdetail.php?f=423&t=1702974&p=1


2012年12月24日 星期一

主子資料表的新增


'新增資料到訂貨主檔
'儲存資料後,超連結到顯示訂單的網頁
        Dim connstr As String = "Data Source=120.xxx.xx.xxx;UID=xx;PWD=xx;Database=北風貿易"
        Dim sqlconn As SqlConnection = New SqlConnection(connstr)
        Dim sqlcmdstr As String = "insert into 訂貨主檔(客戶編號, 員工編號, 訂單日期, 要貨日期, 送貨方式) values(@客戶編號, @員工編號, @訂單日期, @要貨日期, @送貨方式);select @@IDENTITY"
        Dim sqlcmd As New SqlCommand(sqlcmdstr, sqlconn)
        sqlcmd.Parameters.AddWithValue("@客戶編號", Me.TextBox1.Text)
        sqlcmd.Parameters.AddWithValue("@員工編號", Me.TextBox6.Text)
        sqlcmd.Parameters.AddWithValue("@訂單日期", Me.TextBox2.Text)
        sqlcmd.Parameters.AddWithValue("@要貨日期", Me.TextBox4.Text)
        sqlcmd.Parameters.AddWithValue("@送貨方式", Me.TextBox5.Text)
        'sqlcmd.Parameters.AddWithValue("@newid", Me.TextBox7.Text)
        'sqlcmd.Parameters.AddWithValue("@訂單日期", Me.TextBox2.Text)
        sqlconn.Open()
        Dim result As SqlDataReader
        result = sqlcmd.ExecuteReader
        If result.HasRows Then
            Do While result.Read()
                'Response.Write(result(0).ToString)
                Me.Label1.Text = result(0).ToString
                Me.TextBox3.Text = result(0).ToString
            Loop
        Else
            Response.Write("No rows returned.")
        End If

        result.Close()
        'result.Read()
        sqlconn.Close()
        'Response.Write(result.ToString)
        'Response.Redirect("gridview.aspx")
        Me.GridView1.DataBind()


    Protected Sub FormView1_ItemInserted(sender As Object, e As System.Web.UI.WebControls.FormViewInsertedEventArgs) Handles FormView1.ItemInserted
        '當子資料表有新項目新增時, 更新下方的訂單明細gridview1
        Me.GridView1.DataBind()
    End Sub


    Protected Sub FormView1_PreRender(sender As Object, e As EventArgs) Handles FormView1.PreRender
        '當formview重新整理時,將訂單號碼填進去
        Dim orderid As TextBox = CType(Me.FormView1.FindControl("訂單號碼TextBox"), TextBox)
        orderid.Text = Me.TextBox3.Text
    End Sub


 Private Sub Calendar2_DayRender(sender As Object, e As System.Web.UI.WebControls.DayRenderEventArgs) Handles Calendar2.DayRender
        '限制只能在7天以後開放選取交期
        e.Day.IsSelectable = e.Day.Date > Now.AddDays(7).ToShortDateString
    End Sub

   Protected Sub Calendar2_SelectionChanged(sender As Object, e As EventArgs) Handles Calendar2.SelectionChanged
        '輸入交期
        Me.TextBox4.Text = Me.Calendar2.SelectedDate
    End Sub

'更新產品編號
   Protected Sub DropDownList4_SelectedIndexChanged(sender As Object, e As EventArgs)
        Dim productid As TextBox = CType(Me.FormView1.FindControl("產品編號TextBox"), TextBox)
        Dim drop_product As DropDownList = CType(Me.FormView1.FindControl("DropDownList4"), DropDownList)
        productid.Text = drop_product.SelectedValue.ToString
        'Dim ds As DataSet = SqlDataSource1.Select
        Dim connstr As String = "Data Source=xxx.xx.xx.xx;UID=xx;PWD=xx;Database=北風貿易"
        Dim sqlconn As SqlConnection = New SqlConnection(connstr)
        Dim cmd As New SqlCommand("select 單價 from 產品資料 where 產品編號 = @prodid", sqlconn)
        cmd.Parameters.AddWithValue("@prodid", Int(drop_product.SelectedValue))
        Dim reader As SqlDataReader
        sqlconn.Open()
        reader = cmd.ExecuteReader
        If reader.Read Then
            Dim price_text As TextBox = CType(Me.FormView1.FindControl("單價TextBox"), TextBox)
            price_text.Text = reader(0).ToString
        End If
        sqlconn.Close()
    End Sub


  If Me.TextBox3.Text <> "" Then
            Dim connstr As String = "Data Source=xxx.xxx.xx.xx;UID=xx;PWD=xx;Database=北風貿易"
            Dim sqlconn As SqlConnection = New SqlConnection(connstr)
            Dim cmd As SqlCommand
            cmd = New SqlCommand("delete 訂貨主檔 where 訂單號碼='" & Me.TextBox3.Text & "'", sqlconn)
            Dim result As Integer
            sqlconn.Open()
            result = cmd.ExecuteNonQuery
            Response.Write(result)
            sqlconn.Close()
            'If result = -1 Then
            Me.TextBox3.Text = ""
            Dim orderid As TextBox = CType(Me.FormView1.FindControl("訂單號碼TextBox"), TextBox)
            orderid.Text = ""
            Me.TextBox4.Text = ""
            'End If
        End If

2012年12月8日 星期六

網頁產生一二維條碼

因為教學需要,所以放上網路上找到的一二維條碼產生DLL

一維條碼 128碼 DLL(方法1),先下載以下DLL,並加入參考
https://docs.google.com/open?id=0Bxaw7Z2hq9CFWG1iRzJacFN1aGM

以下所產生的一維條碼會顯示在另一個瀏覽器,並不方便

'一維條碼 128碼 呼叫程式碼
   Dim b As BarcodeLib.Barcode = New BarcodeLib.Barcode()
        '支援39, 128, EAN, UPC等
        Dim type As BarcodeLib.TYPE = BarcodeLib.TYPE.CODE128
        Try
            'Me.Image1.Image = b.Encode(type, TextBox1.Text.Trim)
            Dim data As String = Me.TextBox1.Text
            Dim image As New System.Drawing.Bitmap(200, 200)
            image = b.Encode(type, TextBox1.Text.Trim)
            image.Save(Response.OutputStream, System.Drawing.Imaging.ImageFormat.Gif)
        Catch ex As Exception
            'MessageBox.Show(ex.Message)
        End Try

一維條碼 128碼 DLL(方法2),也是下載DLL,並加入參考
將編碼的圖片寫在另外一個.ashx 泛型處理常式中
Imports System.Web
Imports System.Web.Services
Imports System.Web.SessionState     ' 要使用 Session 必需加入此命名空間
Imports System.IO
Imports System.Drawing.Imaging

Public Class barcode
    Implements System.Web.IHttpHandler, IRequiresSessionState
    Sub ProcessRequest(ByVal context As HttpContext) Implements IHttpHandler.ProcessRequest
     
        Dim encodestr As String = ""
        'context.Request("encodestr") 是從傳過來的網址中抓取問號後面encoderstr的變數值
        '例如 http://barcode.ashx?encodestr="123" 則會抓取123
        If context.Session("encodestr") IsNot Nothing Then
            '利用TryParse函數判斷使用者輸入的是數字或是文字
            'If Integer.TryParse(context.Request("scid").Trim(), encoderstr) Then
            'End If
            encodestr = context.Session("encodestr").ToString
            Dim b As BarcodeLib.Barcode = New BarcodeLib.Barcode()
            Try
                Dim image As New System.Drawing.Bitmap(200, 200)
                '支援39, 128, EAN, UPC等,目前是將encodestr編成128碼
                Dim type As BarcodeLib.TYPE = BarcodeLib.TYPE.CODE128
                image = b.Encode(type, encodestr.ToString)
                context.Response.ContentType = "Image/Gif"
                context.Response.Clear()
                image.Save(context.Response.OutputStream, System.Drawing.Imaging.ImageFormat.Gif)
            Catch ex As Exception
                'MessageBox.Show(ex.Message)
            End Try
        Else
            context.Response.Write("sessioin error")
        End If
       
    End Sub
    ReadOnly Property IsReusable() As Boolean Implements IHttpHandler.IsReusable
        Get
            Return False
        End Get
    End Property
End Class


二維條碼 qr code DLL
https://docs.google.com/open?id=0Bxaw7Z2hq9CFa0t4dkVkMEZCOFU


'二維條碼 呼叫程式碼
    Dim encoder As New ByCase.Lib.QRCode.Codec.QRCodeEncoder
        '編碼有3種,分別是byte, alphanumeric, numeric
        encoder.QRCodeEncodeMode = ByCase.Lib.QRCode.Codec.QRCodeEncoder.ENCODE_MODE.ALPHA_NUMERIC

        '(image pixels per QRCode pixel): 1, 2, 3, 4, 5, 10, 15, 30. ( in pixels )
        encoder.QRCodeScale = 5
        '二维码所能包含的字符信息量是由QrcodeVersion的设置值来决定的。将QrcodeVersion设置到20的时候,就已经可以容乃到300多个字节
        encoder.QRCodeVersion = 20
        'ByCase.Lib.QRCode.Codec.QRCodeEncoder.ERROR_CORRECTION.H L M Q
        encoder.QRCodeErrorCorrect = ByCase.Lib.QRCode.Codec.QRCodeEncoder.ERROR_CORRECTION.H

        '只能大寫英文, 數字, 空格+-*/冒號,不可以小寫、不可底線不可特殊符號
        Dim data As String = Me.TextBox1.Text.ToUpper
        Dim image As New System.Drawing.Bitmap(200, 200)
        image = encoder.Encode(data)
        Image.Save(Response.OutputStream, System.Drawing.Imaging.ImageFormat.Gif)

二維條碼(方法2)
Google charts提供非常方便的API,可以產生QR Code圖片。
http://code.google.com/apis/chart/docs/gallery/qr_codes.html(API說明)
以下面URL為例,紅色部份為關鍵參數
https://chart.googleapis.com/chart?chs=120x120&cht=qr&chl=陳錫川&choe=UTF-8&chld=M|2
其中:
chs: QR code 圖片大小
cht: 圖片類型,google charts用這個參數產生各種圖片,這裡當然就填qr
chl: 要藏在QR code裡的文字,必須編成punycode(urlencode)。
choe: 編碼。請注意只支援iso-8859-1, sjis, utf8。詳見API說明網頁。
chld: 其他參數。M是錯誤修正層次,有L, M, Q, H等四級;後面的數字是QR code周圍白邊的寬度。


在webform放置textbox1與button,接著在button中撰寫以下程式即可

    Dim imgsrc As String = "http://chart.apis.google.com/chart?chs=" & "400x400" & "&chl=" & Me.TextBox1.Text & "&choe=UTF-8&cht=qr"
        Image1.ImageUrl = imgsrc


2012年12月6日 星期四

手機取消插播

最近手機電話中竟然有嘟嘟嘟的聲音,我心想是設了插播,打電話到中華電信卻說我的門號沒有設定這項功能,可能是手機自己的設定,原來
取消插播是 #43# 撥出
開啟插播是 *43# 撥出
趕緊記載blogger中

2012年10月5日 星期五

Flexsim使用sink的label屬性來收集時間統計量(最大max cycletime,最小min cycletime,平均average cycletime)


在sink4的OnReset中,先將每個sink4的屬性label先設為零(避免上一次執行結果殘留),接著在sink4的OnEntry中收集


treenode item = parnode(1);
treenode current = ownerobject(c);
int port = parval(2);
{ //************* PickOption Start *************\\
/**Write to GlobalTable*/
settablenum(
/** \nTable: */ /**/"time"/**/,
/** \nRow: */ /**/getlabelnum(item, "serial")/**/,
/** \nColumn: */ /**/3/**/,
/** \nValue: */ /**/time()/**/
);
/**\n\n*/
} //******* PickOption End *******\\
{ //************* PickOption Start *************\\
/**Set Label*/
setlabelnum(
/** \nObject: */ /**/item/**/,
/** \nLabel: */ /**/"outtime"/**/,
/** \nValue: */ /**/time()/**/
);
/**\n\n*/
} //******* PickOption End *******\\
{ //************* PickOption Start *************\\
/**Set Label*/
setlabelnum(
/** \nObject: */ /**/item/**/,
/** \nLabel: */ /**/"cycletime"/**/,
/** \nValue: */ /**/getlabelnum(item, "outtime")-getlabelnum(item, "intime")/**/
);
/**\n\n*/
} //******* PickOption End *******\\
//收集累積的 cycle time
{ //************* PickOption Start *************\\
/**Set Label*/
setlabelnum(
/** \nObject: */ /**/current/**/,
/** \nLabel: */ /**/"accumulatedct"/**/,
/** \nValue: */ /**/getlabelnum(item,"cycletime")+getlabelnum(current, "accumulatedct")/**/
);
/**\n\n*/
} //******* PickOption End *******\\
//收集最小cycle time
if (getlabelnum(item, "serial") == 1)
{
 setlabelnum(current,"minct", getlabelnum(item,"cycletime"));
}
else
{
 if (getlabelnum(current, "minct") > getlabelnum(item, "cycletime"))
 {
  setlabelnum(current,"minct", getlabelnum(item,"cycletime"));
 }
}
//收集最大cycle time
if (getlabelnum(item, "serial") == 1)
{
 setlabelnum(current,"maxct", getlabelnum(item,"cycletime"));
}
else
{
 if (getlabelnum(current, "maxct") < getlabelnum(item, "cycletime"))
 {
  setlabelnum(current,"maxct", getlabelnum(item,"cycletime"));
 }
}
{ //************* PickOption Start *************\\
//收集個數totalnum
/**Increment Value*/
inc(
/** \nNode: */ /**/label(current, "totalnum")/**list:label(item, "labelname")~gettablecell("tablename", 1,1)~node("/Tools/myvalue",model())*/
,
/** \nIncrement By: */ /**/1/**/
);
/**\n\n*/
} //******* PickOption End *******\\
{ //************* PickOption Start *************\\
//計算平均的cycle time: avgct,將累積的cycletime除以個數
/**Set Label*/
setlabelnum(
/** \nObject: */ /**/current/**/,
/** \nLabel: */ /**/"avgct"/**/,
/** \nValue: */ /**/getlabelnum(current,"accumulatedct")/getlabelnum(current,"totalnum")/**/
);
/**\n\n*/
} //******* PickOption End *******\\

flexsim收集全部個體的開始時間, 離開等候線時間,及 離開系統時間

收集Flexsim的時間我設計了兩種方法,第一種方法是每個個體的時間都收集,並export到excel做分析,做法是採用global table來收集,最後在export出去。

flexsim為每個個體產生序號

2012年9月28日 星期五

Excel 2010 運輸問題求解範例(線性規劃)

從網路上找到一個運輸問題的範例,http://www.google.com.tw/url?sa=t&rct=j&q=&esrc=s&frm=1&source=web&cd=1&cad=rja&ved=0CCIQFjAA&url=http%3A%2F%2Fcc.cust.edu.tw%2F~thchu%2FLMex%2FLMLP446question.XLS&ei=-E1mUJ_hE4bGmQWE24GQCQ&usg=AFQjCNEHcLj9YRZrmQKWtkfy1pMMJPqi2g&sig2=EXJalK0d4zkRe7QW4fTGIA
我做了一些修改,加上需求量、供給量 與 距離。

運輸問題是以最低的運輸費用將貨品從工廠送到最接近市場需求中心的倉庫。各工廠必須在出貨量不超出供應量的前提下,同時也要達到滿足每一個市場的需求目的。
  • Excel 2007, 2010 規劃求解, 線性規劃, 運輸問題 需要從 檔案/選項/增益集 執行,勾選 規劃求解選項即可。
  • 如果是Excel 2003,則是在工具/增益集 勾選 規劃求解 選項。


Visio畫直線,取消跨線跳線跳轉

自從改用2010後,很多功能找不到,只能慢慢熟悉了,例如在Visio 2010中,要畫直線,一般預設的連接器會自動折線(自動直角),可是我們常有畫直線的需求,其實這個設定就在
設計/連接器/直線 ,或者要取消跨線 或稱為取消跳線 的功能,同樣在 設計/連接器/取消顯示線條跳轉 即可。